With the popularity of ChatGPT there has been a lot of buzz around generative AI and its capabilities. I’ve been using tools like BingChat and I can confidently say that I’m very impressed with our progress in the field of Generative AI.
But, please remember AI aka “Deep Learning” is not just limited to Generative AI we can also use it for various tasks such as Computer Vision, Tabular Analysis, Collaborative Filtering etc.
So, here is my small attempt to show you how to train a Deep Learning model using Paddy Doctor Kaggle dataset for an Image classification problem.
For an obvious reason, this project has been very personal to me because my father has been a Paddy farmer and I have grown up seeing Paddy fields better part of my childhood and even today if go home I’m surrounded by lush Green Paddy fields in our village. So, I have a deep personal connection to what I’m doing with this project.
The Problem Statement
We have got 10,407 Paddy Leaf training images stored in 10 different folders. Each folder has been assigned a particular decease label or ’normal’ if it’s not infected.
So, our job is to train a Deep Learning Image Classification model to predict whether a given image has been infected or not if it’s infected then identify the decease name.
The angle of attack
For this project I’m using FastAI Computer Vision library to train a model.
Here is my code, it’s pretty much standard and I’ve not used any custom functions. I’m currently using RTX 2060 GPU and for me it took about 5 minutes to train and export model on to ‘pkl’ file.
With this training loop I was able to get 94.7% accuracy (not a world class model at this stage but not bad either to get started).
from fastai.vision.all import *

path = Path('train_images')
Path.BASE_PATH = path
path.ls()

dblock = DataBlock(blocks=(ImageBlock,CategoryBlock),
                   splitter=RandomSplitter(),
                   get_items=get_image_files,
                   get_y=parent_label,
                   item_tfms=Resize(size=460,method='squish'),
                   batch_tfms=aug_transforms(size=230,min_scale=0.75))


dls = dblock.dataloaders(path,bs=64)
dls.show_batch(max_n=6)

learn = vision_learner(dls,resnet34,metrics=accuracy).to_fp16()
learn.lr_find(suggest_funcs=(slide,valley))

learn.fine_tune(8,1e-3)
learn.export('model_res_94_7.pkl')
The GUI for end user interaction
Training a Deep Learning model is a starting point but we need to think about the end users. We should create a simple GUI to expose this application so that the end users can make use of it.
The GUI framework I have selected for this project is PyQT5 with QT designer for rapid development and it works amazingly well for cross platforms like Windows and Linux (I’m not a Mac user so can’t comment).
This is certainly not a tutorial about GUI development but if you are interested then you can refer this amazing tutorial from Python GUI’s website, I have personally used this tutorial [this is not an affiliate link].
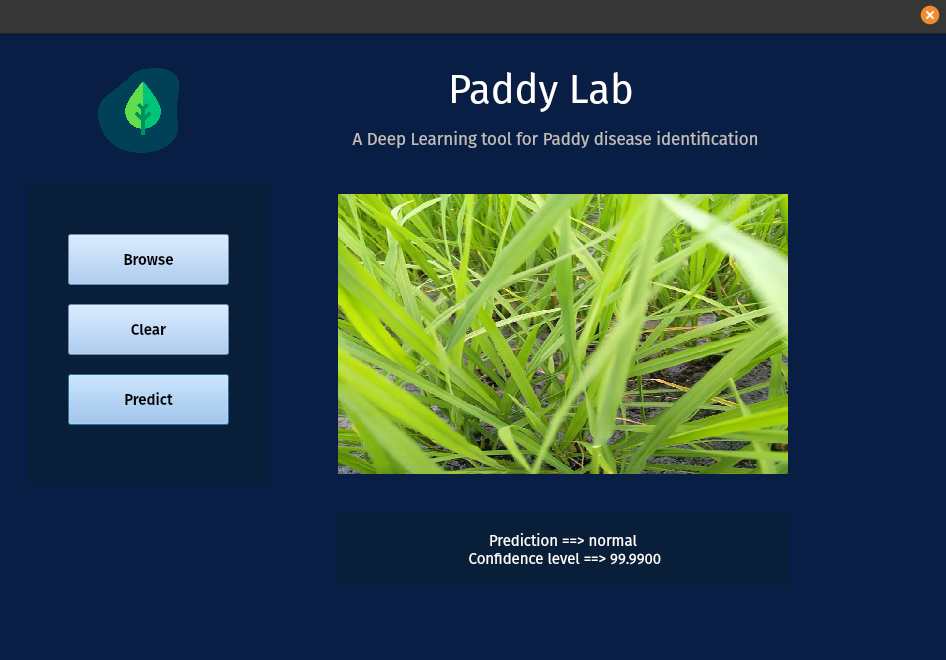
Here is a screenshot of my GUI when it initializes.

And here is during inference stage.
Now that UI is ready, I need integrate our trained model to work with this GUI seamlessly.
Initially, I have tried to integrate pkl model directly with desktop application, it did work during my development stage but when I tried to compile with pyinstaller that’s when everything has fallen apart.
Somehow it didn’t work and the other drawback was the compiled application file size was about 1.5 GB, which is insane for a small application.
So, I have abandoned my plans and started thinking about ‘API’.
API - A magic layer between GUI and Server
Until now I had zero knowledge about API’s, I’ve vaguely understood how API’s work but I didn’t had a choice other than abandoning the entire project.
Again, I went back to FastAI training videos to try and see if there are any options available. That’s when I’ve learned about Huggingface spaces and a little bit about its API.
After reading few other tutorials and their documentation, I have implemented a simple model using Gradio and hosted it on Huggingface spaces.
If you remember in my previous code block we have a trained a model and then exported to 'pkl' file.
In this code, I’ve used same model_res_94_7.pkl file to run interpretation - here is my code block.
import gradio as gr
from fastai.vision.all import load_learner, PILImage
import gradio as gr

model = load_learner('model_res_94_7.pkl')

def prediction(img):
    img_to_pred = PILImage.create(img)
    res,pos,prob = model.predict(img)
    return {res: format(prob[pos],'.4f')}

gr.Interface(fn=prediction,inputs="image",outputs="label").launch()
Once its ready, we need to name it as app.py and create requirements.txt file with your requirements, in my case it’s fastai.
After that we need to place all the files in Huggingface spaces like below and it will take some time to build your app. Once its ready we can access from the public link.
And here is PaddyLab public link.

API issues I have faced and workarounds
Gradio team has done fantastic work to integrate Gradio API with our own app, it was just one click. In fact they have even created a python library to integrate with our own code.
So, as usual I was super excited and based on their documentation I have integrated into my GUI. As expected everything worked perfectly during the development phase.
But, again I have faced one more hurdle i.e. after converting the script into executable file the file didn’t work. After going through various error logs I could see that the Gradio API framework wasn’t working well in my case.
So, I’ve written a custom API function after quite a bit of research as below:
 # image_to_bse64 function credit gradio_client
    def image_to_bse64(self,file_path):
        with open (file_path,'rb') as img_file:
            img = base64.b64encode(img_file.read())
            base64_str = str(img, "utf-8")
        return ("data:" + "" + ";base64,"+ base64_str)


    API ='https://sudheernotes-paddylab1.hf.space/api/predict'
    r = requests.post(API,json={"data":[image_to_bse64('YOUR_FILE_NAME')]},timeout=15)
    output = r.json()
    for items in output['data']:
        for j in items['confidences']:
            prediction = j['label']
            probability = j['confidence']

    pred_txt = f"Prediction ==> {prediction} \n Confidence level ==> {format(float(probability)*100,'.4f')}"
    print(pred_txt)
Putting altogether
Now that I’ve all the code and GUI components ready, it’s time for me to assemble all of this into a single file and generate.exe file to run it on Windows as a standalone desktop application.
Here is my final code that was integrated fully with GUI.
So, that comes to an end of my project, you can download.exefile from GitHub and try it yourself.
import sys, os
from PyQt5.uic import loadUi
from PyQt5 import QtGui
from PyQt5.QtWidgets import QDialog, QApplication, QFileDialog
import requests
import base64


base_dir = os.path.dirname(__file__)

class WelcomeScreen(QDialog):
    def __init__(self):
        super(WelcomeScreen,self).__init__()
        loadUi("MainGUI.ui",self)

        self.filename = ""
        icon_file = QtGui.QPixmap(os.path.join(base_dir,"icons","paddy.svg")).scaled(110,110)
        self.lbl_main_icon.setPixmap(icon_file)
        self.btn_browse.clicked.connect(self.file_dailog)
        self.btn_clear.clicked.connect(self.clear_canvas)
        self.btn_predict.clicked.connect(self.prediction)


    def file_dailog(self):
        self.clear_canvas()
        filename,_ = QFileDialog.getOpenFileName(
            parent=self,
            caption='Select your Image file',
            directory=os.getcwd(),
            filter ="jpg/png(*.jpg *.jpeg *.png)")
        pixmap = QtGui.QPixmap(filename).scaled(450,280)
        self.lbl_img_view.setPixmap(pixmap)
        self.filename = filename

    # image_to_bse64 function credit gradio_client
    def image_to_bse64(self,file_path):
        with open (file_path,'rb') as img_file:
            img = base64.b64encode(img_file.read())
            base64_str = str(img, "utf-8")
        return ("data:" + "" + ";base64,"+ base64_str)

    def prediction(self):
        if not self.filename == "":
            try:
                API ='https://sudheernotes-paddylab1.hf.space/api/predict'
                r = requests.post(API,json={"data":[self.image_to_bse64(self.filename)]},timeout=15)
                output = r.json()
                for items in output['data']:
                    for j in items['confidences']:
                        prediction = j['label']
                        probability = j['confidence']

                pred_txt = f"Prediction ==> {prediction} \n Confidence level ==> {format(float(probability)*100,'.4f')}"
                self.lbl_message.setText(pred_txt)

            except requests.exceptions.Timeout:
                self.lbl_message.setText("[Timed out] Server not responding \n please try after sometime")

            except requests.exceptions.ConnectionError:
                self.lbl_message.setText("Please check your internet connection..")

        else:
            self.lbl_message.setText("Please select an Image")

    def clear_canvas(self):
        self.lbl_img_view.clear()
        self.lbl_message.clear()
        self.filename = ""

# Main
app = QApplication(sys.argv)
widget = WelcomeScreen()
widget.setFixedHeight(630)
widget.setFixedWidth(950)
widget.setWindowTitle(" ")
widget.setWindowIcon(QtGui.QIcon(os.path.join(base_dir,"icons","paddy.svg")))
widget.show()

try:
    sys.exit(app.exec_())

except:
    print("exiting")
Takeaways
- Project based learning is the best approach to learn hard subjects like Deep Learning (or anything for that mater)
- At times you may feel it’s impossible and you may want to let go and move on but remember it’s temporary feeling, so take some rest and revisit again next day
Limitations
- Since the Paddy plant is part of Grass Family you can easily fool this deep learning model by uploading a photo of a Grass and you will get some kind of predictions
- Nothing is 100% perfect, so there is always a room for improvement and no exception for this model as well
What next
-
Converting the first limitation into an opportunity by training another deep learning model to first recognize whether an image is Paddy plant or not and that should act as a gate before the actual prediction
-
Creating my own API using FastAPI (I have zero knowledge about it, I think it will be a good learning opportunity)
Credits: